Sunday, November 15, 2015

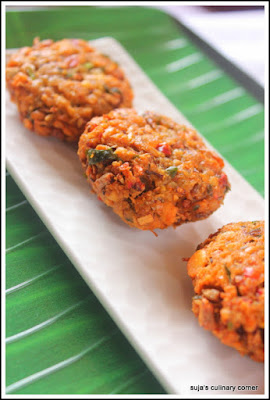
Vazhaipoo Vadai/Banana Blosssom Fritters


The heavy rains and the chill weather in chennai makes me crave for something crispy and hot.and this recipe which I learnt from my mother is definitely a super hit in my family.yes it is the vazhapoo vadai or banana blossom fritters which I am talking about.even those who don't like vazhaipoo will love this vadai.it is an ideal evening snack with tea or coffee and tastes good with plain hot rice and rasam .


Preparation time :40 mins
Serves:4

Ingredients:

Chopped Vazhaipoo or banana blossom -1 cup
Chopped onion-1 no
Asafetida or Hing-1 tsp
Salt-to taste
Fresh coriander leaves-a small bunch
Mint leaves-6(optional)
Roasted gram dal flour or pottu kadalai maavu -1/4 cup

To be grind to a coarse paste:

Toor dal or pigeon pea -1 cup
Gram dal or kadalai paruppu -3 tbsp
Red chilies-4 or 5
Garlic-4 pods
Ginger-1/2 inch
Fennel seeds-1 tsp
Curry leaves- a small bunch 

Procedure :

1.Soak both the along with red chillies for 30-40 mins.


2.Once it is soaked well and keep the ingredients ready.Drain the water completely from the dals and grind it along with the ingredients given for grinding to a coarse paste.Do not add water .If required sprinkle a few drops.


3.To the ground paste add chopped vazhaipoo,onion,salt,hing,mint and coriander leaves.


4.Then add the pottu kadalai Mavu or roasted gram dal flour to this mixture and mix well.Take a small portion of this mixture and round it to a small ball and press lightly to make vadais.
5. Heat oil in a wok and keep the flame to medium.When the oil is hot ,drop the vadai one by one carefully and fry them till they are golden brown on both sides and drain it in a tissue.

6.Delicious,golden brown and crispy vazhaipoo vadais are ready to be served.


Tips:

*Do not add water when grinding the dals .If the mixture is too watery then add more gram dal flour to get a firm mixture that can be rolled in to vadais.You can even refrigerate the mixture of its a bit watery .
*To clean and chop banana flower refer:
*Increase or decrease the amount of chillies based on your spice level.

Saturday, November 14, 2015

Paneer Pulao (Cottage Cheese Pulao)


My son is a great fan of paneer no matter what the dish.so paneer is on our family menu at least once a week but believe me I don't know why I haven't posted a single paneer recipe on my blog yet.I guess I mostly make paneer for dinner and either I get too tired to click a picture or the lighting is not sufficient.So this time when I made Paneer Pulao for lunch and the first thing I decided is to make a post of it on my blog .Here goes everyone's favourite Paneer Pulao and I served it along with small onion and capsicum raita (which I will post soon).to add colour to the pulao I added green peas.You can add other veggies too.


Preparation time:20 mins
Serves :3

Ingredients:

Paneer or Indian cottage cheese cubes-200 gms
Basmati rice or (jeeraga samba rice which I used here)-1 1/2 cup
Green peas-1/2 cup
Thinly sliced onion-1 no
Chopped fresh mint leaves-1/4 cup
Chopped fresh coriander leaves-1/4 cup
Garam masala-1 tsp
Salt -to taste
Sugar-1 tsp
Milk-1/2 cup
Oil-2 tbsp
Ghee-1 tbsp

To be grind to a fine paste:
Small onion or pearl onions-6 to 7 no
Garlic -5 pods
Ginger-1 1/2 inch
Green chillies-2( depending on your spice level)

To temper:
Star anise-2
Bay leaves-2
Cinnamon-2 one inch sticks
Green cardamom -2
Cloves-2


Procedure:

1.Grind the ingredients given for grinding to a fine paste.


2.Heat a cooker,add 1 tbsp of oil and ghee .Then add the sugar and once it caramelizes add  the ingredients given for tempering .Now ass the sliced onions and saute well.

3.Once the onions turn golden brown add the ground pate ,followed by chopped mint and coriander leaves.


4.After it is sauteed well ,add the green peas and soaked basmati rice and mix well.


5.Then add the water and milk followed by garam masala. Mix well and close the cooker lid and cook for 2 whistles.In a separate wok add a tbsp of oil and shallow fry the paneer till they are golden brown.Place this roasted paneer inside warm water to retain its softness.


6.Add this paneer to the cooked rice and mix well when it is hot so that the flavour blends well with the paneer.


7.The most yummy and flavorful paneer pulao is ready in a jiffy.Serve hot with any raita of your choice.


Tips:

*I used Jeerasamba rice so the grains are small.You can use basmati rice to get a long grain texture but flavour wise both are good.
*Mixing the paneer after the rice is ready helps it to keep soft .If you cook the paneer along with rice,sometimes it turns rubbery.

Monday, November 9, 2015

Ragi Laddu/Finger Millet Ladoo


Diwali is here and all I wanted to make this Diwali is something healthy as well as yummy .There was a pack of sprouted ragi flour in my freezer for quite sometime (I keep my flours in freezer so that it keeps fresh without any insects) and I usually make ragi dosa or ragi cookies with it.I wanted to ragi Laddus for this Diwali as these finger millets are packed with all the nutrients and also they are sprouted to add which is more nutritious and ideal for growing kids .I was curious about the taste but believe me it was more delicious than maa Laddu and my son seeing the colour thought it as chocolate Laddu and enjoyed it a lot.So Happy Diwali guys ! Enjoy your Diwali with these delicious Ragi lLddus.


Preparation time :30 mins
Makes:25 medium sized laddus 


Ingredients:
Sprouted ragi flour/ragi flour-2 cups
Sugar-1 cup
Ghee-1/4 cup or as needed to shape the laddus 
Cardamom powder-2 tsp
Assorted  chopped nuts(almond,pistachio,cashew)-3 tbsp

Procedure:

1.Dry roast ragi flour on slow flame till a nice aroma comes for around 15 mins.


2.Powder the sugar to a fine powder.Add this sugar to the roasted ragi flour and add the cardamom powder too.


3.Heat ghee and roast the nuts till they are golden brown. Add the flour and sugar mixture to the ghee and roasted nuts and mix well. Switch of the flame.


4.After mixing them well take a small amount of the mixture and press well between the palm to make laddus. 


5.Delicious and healthy ragi laddus are ready to be relished.


Tips:

*If the flour is not roasted properly then the laddus will not taste good.
*Use sufficient ghee to make balls out of the flour.
*I used sprouted ragi flour.You can also use normal ragi flour.
*You can reduce the sugar to 3/4th cup if not sweet toothed.
*These laddus tastes absolutely delicious.


Saturday, November 7, 2015

Senai Kadi(Elephant Yam dal)


Senai Kadi or Elephant Yam Dal or Senai Kootu is one of my favourite dish .Everytime my mom makes it ,I will be eagerly waiting to have it with hot rice and paruppu and a spoon of ghee.Generally we make a shallow fry with senai kizhanghu or elephant yam  which is usually loaded with calories as we use a lot of oil to shallow fry it.But this is a very healthy and tasty alternative to use this root vegetable .My mom used to say that is a dish which she learnt from my paternal grandmother who hails from Thirunelveli.


Preparation time :30 minutes
Serves:3


Ingredients:

Elephant yam or senai (chopped)- 200 gms
Moong dal or pasi paruppu -5 tbsp
Finely chopped green chillies-2 nos
Finely chopped ginger-1/2 inch
Turmeric powder-1/2 tsp
Hing or asafetida-1/2 tsp
Tamarind - 1 small gooseberry size 
Salt- to taste
Oil-1 tbsp
Coriander leaves-to garnish

To be grind to a fine paste:
Shredded coconut-5 tbsp

To temper:
Mustard seeds-1/2 tsp
Cumin seeds-1/2 tsp
Urad Dal-1 tsp
Red chillies-2
Curry leaves-few

Procedure:

1.Soak the tamarind in half cup of water for 20 mins and extract the pulp.Pressure cook the diced yam along with chopped green chillies and ginger ,moong dal,turmeric powder and hing.


2.Grind the coconut to a fine thick paste .


3.Heat the tamarind pulp till the raw smell goes off.Add the ground coconut paste to the cooked yam and dal mixture .


4.Now add the tamarind extract to it and temper it with the ingredients given for tempering .


5.Garnish with fresh coriander leaves and serve hot with plain rice and rasam.


Sunday, July 26, 2015

Guest Post:Baklava Rolls-A Turkish Delight!

I am so excited as this is going to be the first guest post to my blog by my friend Prabha at Prabhasyummyexperiments !When she asked what type of recipe I would like her to post,I immediately said let it be a dessert as this is the first guest post and let it be a sweet.Prabha agreed immediately and asked me whether she could post the recipe of Baklava!At once I said yes as I always wanted to try this Turkish dessert.Now its time to get a little intro from Prabha before we proceed with recipe.

1.How your passion for food and cooking developed?

I knew only a teeny bit  of cooking before my marriage..
But after marriage and pregnancy, made me aware about eating 
healthy and of course my hubby,he has very fine taste..he's the 
one who made me love food a lot...

2.Name of signature recipe of yours that your family and friends love it

1.Christmas fruit cake - with lots of healthy ingredients -http://prabasyummyexperiments.blogspot.com/2014/12/fruit-cake.html

2.Cheese Puffs-both kids and adults liked it equally

3.Ulunthan Kali- very healthy especially for women

3.Few photography tips

1.Try to use natural lighting outdoor/ near big windows..
2.Tripod is really helpful to take clear pics..
3.Avoid green color props/ plates, if you are a beginner..
4.Garnish,Garnish,Garnish..everything..

4.hobbies

1.Gardening..really the home grown veggies are the best..
and also gives us good workout..we have a little sweet garden full of 
flowers and seasonal veggies..also some herbs..

2..I love reading a lot.. and learning new things..

5.Favourite Internatioal Cuisine

Liked american before..Now more of mexican Cuisine..

6.What do you think about healthy eating and a ny recipes from your blog for weight watchers?

Ice creams are my weakness..So a solution for myself without compromising on taste
is Sorbets...And instead of frying, I try baking dishes..

1.Guilt free summer recipes-
http://prabasyummyexperiments.blogspot.com/p/summer-special.htmlhttp://prabasyummyexperiments.blogspot.com/p/summer-special.html

2.Baked aloo bonda-
http://prabasyummyexperiments.blogspot.com/2015/06/baked-aloo-bonda-baked-urulaikilangu.htmlhttp://prabasyummyexperiments.blogspot.com/2015/06/baked-aloo-bonda-baked-urulaikilangu.html

7.Blogging tips/ Cooking tips

1.Grate refrigerated butter to get room temperature butter quickly..
2.Add small pinch of salt to sweets and pinch of sugar to savory items,
to increase the taste..

8.A recipe you wanted to try for long time and yet to be tried

1.Recipes from mexican cuisine like chalupas and chimichangas..
I love to eat them out, so postponing to try at home..hopfully will try soon..

Baklava


Hi all..

Baklava rolls..a very rich and  sweet pastry from middle eastern cuisine..wow...I'm so glad that I tried it at home..Thank u suja..I'm preparing this for the guest post dear...Thanks for giving me the space to write up ..and as you asked here's a yum dessert..It's such a easy dessert, but one of the best tasting sweet I've tasted ever...Usually involves usage of lots of nuts, some versions have some milk based sweet filling or dry fruit paste as filling..I tried this simple version using just nuts and turned out awesome..Our family liked it a lot...Use good quality phyllo pastry sheets for the best results..Please do give it a try and you will all like it for sure..

Ingredients

IngredientMeasurement
Phyllo Pastry sheet1 pack
Butter1/2 lb
Cashews2 tblsp
Almonds2 tblsp
 Pistachio2 t blsp
Sugar3/4 cup to 1 cup

Method

1.Grind cashews and almonds into rough powder using a dry mixer jar.


2.Defrost the phyllo sheets completely(in fridge for a day or outside for 5 to 6 hours..)..Open the sheets and cut as equal sheets..Melt the butter..Apply melted butter using a brush..Spread the nut mixture on top of butter..


3.Using chapathi roll pin roll it around the roller..Again apply melted butter on the sheet and spread nut mixture and roll..Repeat it for 4 or 5 sheets...Gather the sheets together, so they form a shrinking pattern in the middle of roll pin..


4.Transfer it to the greased baking pan..Repeat the same procedure for all the sheets...Pour the remaining butter evenly on top of the sheets..Bake at 350F (180C) for 35 to 40 minutes or until golden brown on top...While it's baking, prepare sugar syrup of single thread consistency..


5.Cut as equal sized rolls using a sharp knife, when it's still warm..Pour sugar syrup over the rolls..


6.Powder the pistachois...Place it as a line on top of the baklava rolls...Let it soak overnight or atleast 10 hours before serving..


7.Baklava is ready now!


Saturday, July 18, 2015

Guest Post:Arisiyum Paruppum Sadam using avaraiparuppu(Lentil Flavored Rice)


Ever since I started blogging I wanted to invite a friend to do a guest post for my blog and now I am honored and extremely happy to do it for my friend Prabha Bubesh.She is a very enthusiastic and cheerful person with loads of creativity.She is a great motivator and encourages me in every step of my blogging journey .So here goes my guest post for Prabha ...Arisiyum Paruppu Sadam using avarai paruppu,a typical Kongunadu specialty.

Hailing from Coimbatore one cannot say they haven't tasted Arisiyum Paruppu Sadam.It is a very delicious and yummy one pot meal ,packed with protein and carbohydrates to keep you going for the day.More than that it is super easy to make an ideal lunch box recipe.Usually they make it with rice and toor dal but I tried it with avarai paruppu and the outcome was a delectable and flavourful rice .It tastes best when served hot with ghee and potato curry.


Monday, June 22, 2015

Eggless chocolate cake


I never miss out an opportunity to bake a cake and when I got to meet a friend of mine who was pregnant I baked her this super delicious and simple eggless chocolate cake with Nutella as a frosting .
When I searched my recipe diary , I got this easy recipe which I had written 4 years back.
As soon as I opened my diary and saw the recipe, it brought me old memories of my days in Bangalore when my son was a 7 months baby .He used to sleep a lot during daytime(don't ask me about nights! I had sleepless nights  as my kid will be awake at that time!) and I had some time to bake or cook few new recipes.I used to browse a lot and even referred a lot of magazines to try new stuff.And I started writing those recipes in my diary. I had no convection oven at that time and I used to bake my cakes in my microwave using trial and error method.After few bad outcomes I understood my microwave and finally arrived at the correct time for baking cakes.The results are not as you get in a convection oven but they were pretty decent and no one guessed that I used a microwave for baking the cake they ate!

Now that I have the convection,I tried this cake nearly after 4 years and the outcome was as usual a lovely moist and yummy eggless chocolate cake !


Preparation time:45 mins
Serves:4

Ingredients:
All purpose flour/maida-1 and 1/2 cups
Sugar-1 cup
salt-1/4 tsp
Oil-1/4 cup
Cocoa powder-4 tsp
Vanilla extract-1/2 tsp
Baking powder-1 tsp
water-1/2 cup

For topping:
Nutella-100 gms

Procedure:

1.Sift together flour,cocoa powder,salt and baking powder together.


2.Mix water,sugar,oil and vanilla extract till sugar dissolves completely.


3.Add the flour mixture to the liquid mixture one tablespoon at a time.Mix well to form a uniform cake dough.


4.Grease a baking dish and pour the batter in to it and bake for atleast 30-35 min at 350F.


5.Let it cool and then top it with Nutella evenly and then serve.


Tips:

*You can replace water with milk if you are not vegan.
*Similarly oil can be replaced by equivalent amount of butter.But oil gives best results for this cake.
*If using microwave then bake it at high power for about 4 to 4 and a 1/2 mins.Time changes with different models.Check for a toothpick to come out clean if correctly baked.
*You can also use