Sunday, October 19, 2014

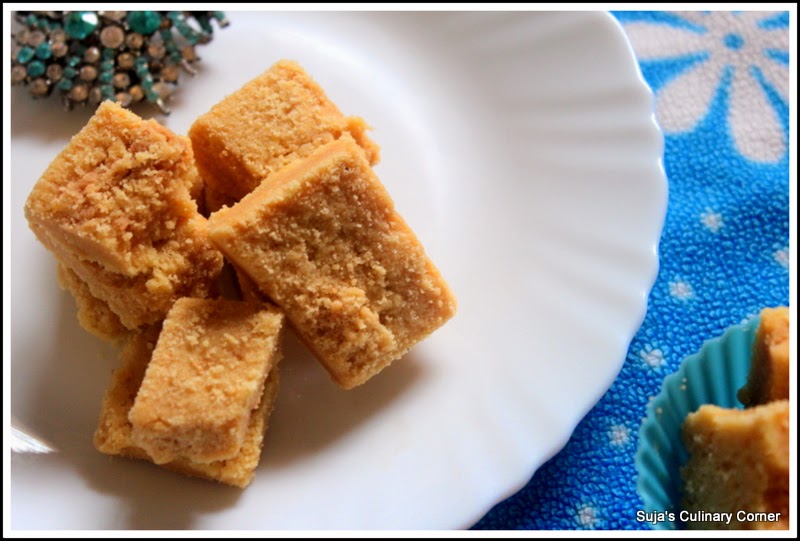
Citrus Burfi/Sweet Lime Burfi


What citrus burfi?Are you kidding?These were the questions I asked to Mrs.Dhanalakshmi Nagarajan a friend of fine and a follower of my blog ,when she told me about the citrus burfi.I feel happy talking to her as she follows my blog regularly and gives her genuine comments and appreciation after trying out few of my recipes.On one such conversation she asked me to try this Citrus burfi and gave me her recipe.She said her sons like these burfis a lot and she has been preparing these burfis successfully for quite a few years.When I took down the recipe it had sweet lime juice as well as milk as part of its ingredients.My immediate question was wont the citrus fruit juice curdle the milk ?Also we will be heating both the ingredients  together in the burfi making process.She said it doesn't and I was still not convinced.But I wanted to try this recipe as it sounded new and with this blog on the go,new ideas are always worth to be tried.So yesterday I started preparing for it and before I switched on the flame I prayed to Lord Ganesh for his blessings on my first attempt(still I was scared about the fact "citrus and milk?").
The recipe has quite a lot of ingredients but most of the things are common and were easily available at home.The only stuff I got for this recipe specially was the orange essence as the recipe mentioned it.It took me quite some time and patience to get these burfis. But all the hard work was worth when you finally get to taste something wonderful and sweet at the end.Yes,first of all the milk never curdled and also the burfis came out perfect.So what  are you waiting for?Try these citrus burfis today itself for this diwali.With the following measurements I got nearly 52 small squares of burfi and weighed nearly a kg.So it is perfect for sharing too.I called Mrs.Dhanalakshmi to thank her for the delicious recipe and told her the burfis came out perfectly.It tastes great at room temperature and stores well up to 3-4 days. 

Citrus Burfi

Makes:52 small burfis
Preparation time:1 hour

Ingredients:
Sweet lime juice-1 cup
Milk-1 cup + Little for soaking cashews
Cashews-1 cup
Maida/All purpose flour-1/2 cup
Besan/Gram flour-1/2 cup
Sugar-3 cups
Butter-1 cup
Ghee-2 to 3 tbsp(optional)
Orange essence-1 tsp

Procedure:

1.Soak cashews in hot milk(just enough milk to soak the cashews) for 20 minutes and then grind it to a fine paste.


2.Extract a cup of sweet lime juice from the fruit.(approximately you will requite 4 sweet limes).


3.Roast Maida and Gram flour till nice aroma arises.Make sure the flours don't change their colors.


4.With the roasted flours,mix all the above mentioned ingredients(cashew paste,milk,butter,sweet lime juice,orange essence,ghee,sugar) and stir well so that no lumps are formed.Make sure the butter is at the room temperature.Even if  mall lumps are there try to break it with the help of the ladle and mix well.


5.In a low flame,keep stirring till the mixture thickens and starts to leave the sides of the pan without sticking to it.This part requires a lot of patience if you are going prepare with the same quantity as me.It takes nearly 40 minutes to get the right texture.Time may reduce if you reduce the quantities of the ingredients proportionally.


6.When it starts to thicken and starts to leave ,switch off the flame and pour the mixture on to a greased plate.Even it out using the ladle and cut in to slices.


7.Once it cools down,separate the pieces and store them in an air tight container for 3-4 days(shelf life).

Citrus Burfi

Tips:

*Ghee is optional.I only used butter and didn't add ghee.
*Make sure the milk is at room temperature before adding it to the flours.
*If you are not able to cut pieces then you have taken the mixture before the correct burfi consistency.Then don't panic,take a small amount and cool it by blowing air if it doesn't set properly bin your hand,then pour back the mixture in to the wok and again mix it well in low flame till it starts to leave the sided of the pan and again pour it on to the greased plate and cut it into pieces.

Citrus Burfi


Wednesday, October 15, 2014

Mysore Pak


Making mysore pak was a really a big experience for me.It was in 2012 for diwali I decided to make mysore pak which came as halwa and again I tried for new year 2013 when I got a too firm and hard burfi like mysore pak. I was like Mohammed Gazhini(not giving up so easily) and browsed a hell lot of blogs and books for mysore pak and came across a microwave version mysore pak and wanted to try it ,hoping this method will yield at least a decent mysore pak and decided to try it for diwali 2103 and two of my enthusiastic neighbors too joined me to see how to make mysore pak(that too in microwave) and what I got was a puttu (powder form)made of besan and was feeling really bad as I failed this time also that too in front of my neighbors.Finally I ended up making 7 cup burfi that diwali.This time I asked my mom in law to help me with the proportion and correct consistency as she had already made mysore paks before.Eureka!! Finally I was able to make mysore pak,not the Krishna sweets type but the traditional textured melt-in mouth mysore pak .I made a small batch for trial and as the taste was awesome it got over in 2 days and so this diwali is going to be celebrated with delicious homemade mysore pak , of course a bigger batch.

I was stirring in one hand and taking pictures in the other and as I was very cautious to get a good mysore pak I missed out pictures on few stages as well as the quality of step by step pictures are not satisfactory yet all this makes it up for the most delicious melt in mysore pak at the end and so I wanted to post this recipe now. When I make a bigger batch I will surely upload a much better step by step pictures.the proportion to be remembered is gram flour: ghee : sugar= 1:2:3 .I prepared a small batch with 1/4 th of a cup of gram flour and I got nearly 12 pieces of mysore pak.You can scale it up easily with the above proportion.The time increases with the increase in quantity of ingredients.


Preparation time :15-20mins
Makes 12 pieces

Ingredients:

Besan/gram flour-1/4 cup
Ghee-1/2 cup
Sugar-3/4 cup
Water-just enough to immerse the sugar and not more than that

Procedure:

1.Roast gram flour till nice aroma arises but it should not change color.Remove it from the flame and keep it aside.


2.Heat the ghee in a low flame on another wok.


3.Heat sugar and water in a wok and boil the sugar till the sugar syrup reaches one string consistency.That is,if you take a small amount syrup between your thumb and index finger and stretch it should form a single string.at this stage add gram flour little by little and stir continuously so that no lumps are formed .


4.Keep stirring and at regular intervals add the hot ghee little by little to this mixture.At one point the mixture would leave the sides of the pan and will look frothy as below and by this time you should have added all the mentioned quantity of ghee to this mixture.Transfer the contents to a greased tray or plate.This stage is important if you miss it then you will not get a melt in mysore pak but it will harden and crumble as well.


5.After 5 mins cut them into pieces and once cooled completely you can take away the pieces and store them in an air tight jar.It tastes good up to 6-8 days when stored in an air tight container.


Tips:
*Make sure you use a high quality gram flour for Mysore pak as its taste relies on the quality of gram flour or besan.
*Do not reduce the amount of ghee.
*The single thread consistency for sugar syrup is very important.


Sunday, October 12, 2014

Baingan Bharta(Smoked Eggplant Curry)


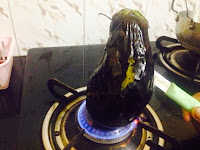
I have never made Baingan Bharta before though we enjoy Ennai Kathrikai and Bhagara Baingan at home.This time I wanted to try it at home and the moment I stepped in to the pazhamudir nilayam I grabbed the aubergine(big sized brinjal) first.I browsed a lot of recipes and the main four ingredients necessary for Baingan Bharta apart from brinjals are onions,tomatoes,ginger and green chillies.I started smoking the brinjal on the stove top and the smoked flavour immediately reminded me of my mom 's brinjal ghosthu for pongal or idli, as we smoke the brinjal for the ghosthu as well.The dish was pretty easy and my husband liked my first homemade Baingan Bharta with hot phulkhas/roti.


Preparation time:25 mins
serves:2

Ingredients:

Aubergine(big brinjal)-1 no
Chopped onion-1 no
Chopped tomatoes-2 nos
Ginger-1 inch
Jeera-1 tsp
Garlic-4 cloves
Green Chillies-2 no
Chilli powder-1 tsp
Garam masala-1 tsp
Turmeric powder-1 tsp
Fresh coriander leaves-to garnish
salt-to taste
Oil-2 tbsp

Procedure:

1.Apply a tsp of oil on the brinjal and place it on the stove top in medium flame.Keep tossing it to the other side every few minutes so that it gets cooked evenly.Be careful when doing this as the oil on brinjal makes it slippery.You could insert a knife inside the brinjal and use it to turn the brinjal.


2.After it is done on all sides,remove it from the flame and let it rest for a few minutes to cool down.Then peel of the skin.


3.Mash or cut the brinjal.If some parts of the brinjal are not cooked ,then dont worry it will get cooked when we saute it with tomatoes with lid closed.

4.Grind green chillies,ginger and garlic to a fine paste.


5.Heat oil in a wok and add the jeera.After it splutters add the ground paste and mix till raw smell is gone.


6.Then add the chopped onions,salt and turmeric powder.Saute it till the onions are transparent.Add the chopped tomatoes and mashed brinjal and add chilli powder also.Saute well till the tomatoeas are soft and the brinjals are also cooked completely.This will take 5-6 mins roughly.


7.Once its done add the garam masala and mix well and remove it from flame.Garnish it with fresh coriander leaves and serve hot with phulkhas or rotis.


Tips:

*I have grinded the green chillies and ginger/garlic.You can also chop and add it.
*Increase/decrease the green chillies and chilli powder according to your spice level.
* You can also grill the brinjal in oven but stove top gives an authentic flavour to the dish.


Wednesday, October 8, 2014

Vegetable Stew for Idiappam

Vegetable Stew

Vegetable stew remains my favorite from my school days when my mom makes it by taking thin and thick milks from coconuts and making homemade idiappams.I and my brother used to compete for the delicately flavoured vegetable stew while eating our idiappams for breakfast. It has very few ingredients yet the coconut milk adds a unique and nice flavor and taste to this dish.But unlike my mom,sometimes due to laziness I buy this nestle coconut milk powder (small sachet) from the store to prepare the coconut milk and the results are pretty decent and yum,though the traditional way of extracting milk from fresh coconuts always  yields the best outcome.By using the store brought coconut milk powder the dish is much more easy to prepare and reduces our effort and time without compromising on the taste.


Vegetable Stew


Preparation time:30 min
Serves:3

Ingredients:

Mixed vegetables(carrot,potato,peas etc.,)-250 gms
Green chillies-3 no
Ginger-1 inch
Garlic-5 pods
Fennel seeds-1 tsp
Cinnamon - 1/2 inch stick
Clove-1 no
Cardamom-1 no
Thick coconut milk-2 cups(I used one small sachet maggi coconut milk powder)
Chopped onion-1 big 
Turmeric powder-1 tsp
Salt - to taste
Coconut oil-1 tbsp
Coriander leaves - to garnish

Procedure:

1.Grind ginge,garlic,fennel seeds and green chillies to a fine paste.


2.Boil all the vegetables till they are soft and succulent.


3.In a pan ,heat the coconut oil and add the cloves,cinnamon and cardamom.After a minute,add the chopped onion and saute well.


4.Once the onions turn transparent ,add the ground pate and saute well till the raw smell goes off.Then add the boiled vegetables.If you feel the mixture is too thick you can optionally add 3-4 tbsp of water along with the vegetables(or you can add the vegetable stock i.e the water in which the vegetables boiled).


5.When the mixture starts boiling add the thick coconut milk.If you are using coconut milk powder from store then prepare thick milk according to the instructions on the pack.But using a little less water than specified on the pack for thick milk yields a much more rich and creamy thick coconut milk.


6.After adding the coconut milk ,make sure you don't cook in high flame as it will curdle the milk.Cook in a low flame for 5 minutes and then switch off.Garnish with fresh coriander leaves and serve hot with idiappam or appam.This stew tastes great even with uthappam or dosa.

Vegetable Stew

Tips:
*Using thick coconut milk is mandatory.
*If you are preparing fresh coconut milk at home then you can use the thin milk or second coconut milk to boil the vegetables.
*Do not cook the stew for too long after adding the thick coconut milk as it will curdle on high heat.

Saturday, October 4, 2014

Badam Katli( Almond Fudge)


I never attempted badam katli or kaju katli before though I have made few burfis like 7cup burfi and boost burfi.But one of my friend makes excellent kaju katlis for occasions like birthdays and festivals in her house.So whenever I visit her house on any such occasion,I never miss to taste those delicious kaju katlis,It motivated me to try at home and I asked her for the recipe and to my surprise it was much easier than the ones on the internet and I wanted to try one immediately.Instead of kaju katli,I tried badam katli as I had a lot of sliced almonds in my freezer.Generally badam katli is made by soaking almonds in hot water and removing its skin  and then grinding it to a fine paste.But as my almonds are sliced,I could not peel it so I decided to soak it and grind it as such.So the color of the katlis were a bit different with no sacrifice on taste.


Preparation time:25-30 mins
Makes:15 burfis

Ingredients:

Almonds-2 cups
Sugar-2 cups
Saffron-2 pinches
Milk-2 tbsp
Ghee-2 tbsp

Procedure:

1.Soak saffron in a tsp of hot milk and keep it aside.


2.Soak almonds in hot water for one hour.After one hour drain the water and grind almonds to a fine paste by adding milk to it.Add sugar along with it and grind it to a very fine paste.


3.Transfer the mixture to a wok and in medium flame keep stirring continuously.Add the ghee also.


4.When the mixture starts boiling,add the saffron milk mixture and keep stirring.When the mixture starts leaving the sides of the wok,switch off the flame.


5.Take a small portion of the mixture and try to roll it into a small ball,if you are able to roll out into a small ball without sticking to your fingers ,then it is the correct stage.If not keep stirring in low flame,till this consistency is reached.


6.Transfer the content on to a greased plate and even it out and cut in to diamond shaped katlis.


7.After the mixture turns warm,carefully take the katlis out and serve.


Tips:

*You can also take the dough and after it turns warm,on a clean counter roll out like a chappathi and then cut into diamond shaped katlis.
*The amount of ghee was just right,as almond releases oil when heated which will be sufficient.