Sunday, September 21, 2014

Hyderabadi Vegetable Dum Briyani


Who won't crave for hot and spicy Hyderabadi veg briyani?I love it and I some how feel that the nearest Grand snacks restaurant ie amirtham in my area serves the best veg Dum Briyani. And whenever we feel like having Dum Briyani we go there.i tried once at home but isn't get it perfectly(it was good but not same as the one we ate at the restaurant ).So after a lot of trail and errors over a period of time I finally got a dum Briyani which was close to the taste of amirtham restaurant and my folks were happy and relished it.Though this Briyani was spicy for us ( our husband and kid's spice tolerance is very very low),you can add more green chillies or red chilli powder if your spice level is high.


Preparation time:35 mins
Serves:3

Ingredients:

Basmati rice-2 cups
Mixed  chopped Vegetables(carrot,beans,cauliflower,potato,peas)-1 1/2 cups
Thinly sliced onions(lengthwise)-1 no
Tomato purée -from 1 tomato
Ginger-1 inch
Garlic-6 cloves
Small onions-5 nos
Curd-1/2 cup
Bay leaves-4
Cinnamon stick 1/2 inch -3 nos
Peppercorns-5
Cloves-4 
Cardamom-4
Slit Green chillies-4
Chopped coriander leaves-1/4 cup
Mint leaves-1/4 cup
Cashews-5 
Raisins-5
Chilli powder-2 tsp
Turmeric powder -1 tsp
Sugar-1 tsp
Garam masala-1 tsp
Oil-2 tbsp
Ghee- 1 tbsp

Procedure:

1.Wash and Soak 2 cups basmati rice in 3 cups of water for 20 mins.


2. After 20 mins add the whole garam masala(2 bay leaf,1 cardamom,2 peppercorns,2 cinnamon sticks and 1 clove) and cook them till they are fluffy and 3/4 th cooked.I cooked in a heavy bottom Kadai with lid on, till they are 3/4 th cooked.


3. Spread the cooked rice on a plate and let it cool down and the grains separate.


4.Take half portion of this rice and mix 1/2 tsp turmeric powder and keep it separately.


5.Grind ginger,garlic and small onions to a fine paste.


6.Heat a wok with 2 tbsp of oil and add the remaining bay leaves,cinnamon,cloves,peppercorns,cardamom and a tsp of sugar
.

7.when the sugar carmelises add the sliced onions and slit green chillies and sauté till the onions are golden brown.


8.Add the ground garlic,ginger and onion paste and mix well and cook for minute.then add the tomato purée ,chilli powder,turmeric powder and salt and sauté till the tomatoes are cooked.


9.Now add 1/4 th cup of curd and mix well.add the vegetables and half of coriander leaves and mint and sauté well for a minute.now add a cup of water and close the wok with a lid.


10.Cook till the vegetables are done.the consistency should be semi-dry gravy.Before taking it off the heat,add garam masala.


Preparation of Dum :

11.Fry the cashews and raisins in a tbsp of ghee and keep it separately.
12.In a heavy bottomed pressure cooker add a tbsp of ghee and spread half of the white and yellow rice and then spread the vegetable gravy, add the fried nuts and raisins,and some coriander and mint leaves
.

13.Add the remaining white and yellow rice on top of the vegetables and spread some nuts,coriander and mint leaves. Add the remaining curd on top of this rice.repeatthe above process if you have more rice and vegetable gravy( if you are preparing for a large group).


14.Close the cooker with the lid but don't put the whistle and simmer the flame.let it cook for 8-10 mins.


15.After this time, open the cooker and mix it delicately so that the rice don't get mushy and you can add another tbsp of ghee when mixing the rice to get a rich taste and flavour.Serve hot with raita.


Tips:

* I didn't have star anise, but you can add it if you have along with cinnamon and other spices.
*Make sure you cook the basmati rice to 75% . It gets cooked fully when it is on dum.
*The vegetables mixture should be semi-gravy and not completely dry.
*If you wish,you can garnish the hyderabadi vegetable dum briyani with fried onion slices.

Wednesday, September 17, 2014

Vegetable salad with green chutney and roasted Peanuts


Few years back I used to say eeewww :-(,when I see a salad and believe me now I started eating them on a regular basis.This time the credit goes to my mother in law as she makes salads regularly at home and everyone likes to eat it.After marriage I was surprised to eat raw vegetables along with rasam or sambar.But some of my mother in law's salads are really tasty with addition of simple ingredients and also due to the increasing awareness of healthy eating,I developed a like towards tasty salads and they are truly stomach filling and helps you to take reduced amount of rice or roti.It serves as a good side dish for sambar or vathakuzhambu  with hot plain rice also.

Serves:3
Preparation time:10 mins

Ingredients:
Grated Carrots-2 nos
Finely Diced cucumber-1 no
Finely chopped onion-1 no
Finely chopped tomato -1 no
Pomegranate kernels -from 1/2 of its fruit
Roasted and coarsely powdered peanuts-4 tbsp
Salt-to taste
Chopped fresh Coriander leaves- few

Procedure:

Mix all the above ingredients in a bowl and serve.yummy vegetable salad is ready to eat.


Tips:
1.Refrigerate salad for later use.
2.To know how to make green chutney click here.
3.You can even add chopped capsicum,steamed American sweet corn kernels to this salad.


Friday, September 12, 2014

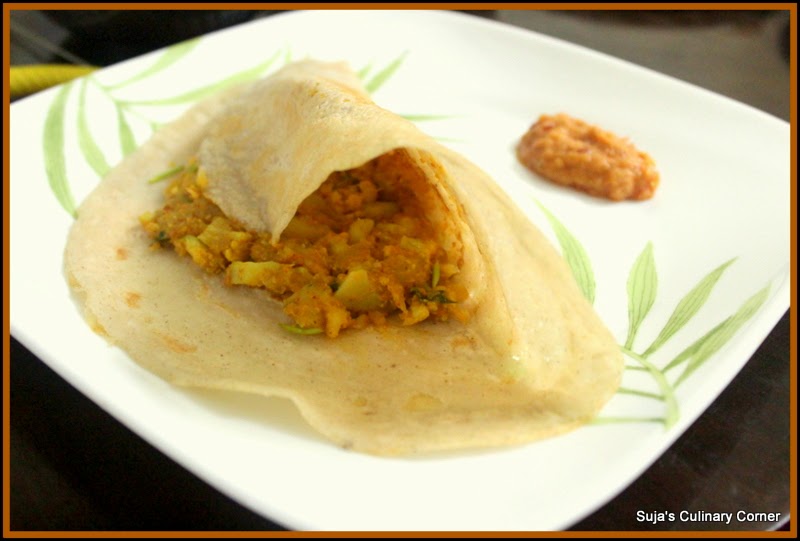
Potato Cauliflower Masala Dosa


Masala Dosas always top our menu for either breakfast or dinner and leave us a feeling of had a grand and filling meal.This potato cauliflower masala dosa is yet another variety which is very tasty and delicious and very simple to make.It tastes good with coconut chutney or tomato/onion chutney but we like to eat it even without any sidedish as the masala itself makes it up for all.


Preparation time :20 mins
Serves:3

Ingredients:

Cauliflower florets-from 1 small cauliflower
Boiled potato -3 no s
Small onions(chopped)-10 nos(if you don't have small onions you can use big onion)
Chopped tomato-1 big no
Chilli powder-1 tsp
Turmeric powder-1 tsp
Salt-to taste
Jeera-1 tsp
Oil-2 tbsp
Fresh coriander leaves-few for garnish

To be grinded to a fine paste:
Garlic-5 to 6 cloves
Ginger-1 inch
Cinnamon stick-1/2 inch
Cloves-1
Cardamom-1
Bay leaf-1
Poppy seeds-1 tsp
Cashew nuts-3 to 4
Coconut-2 tbsp
Fennel seeds-1 tsp

Procedure:

1.Soak the cauliflower florets in hot water with a pinch of salt and turmeric powder.


2.Grind the above said ingredients to a fine paste .


3.Heat oil in pan and add jeera.After it splutters ,add onions and sauté well.


4.After the onions turn transparent add tomatoes,turmeric powder,chilli powder and salt and mix well till the tomato gets cooked well. 


5.Now add the ground paste and roast well till the raw smell goes off.


6.Add the cauliflower florets and add a cup of water and cook till the cauliflower florets are soft.Now add the boiled and mashed potatoes.cook till the mixture thickens and there is no water in the gravy.


7.After all the water has been absorbed and the mixtures becomes thick switch off the flame and add chopped coriander leaves.


8.Make dosas as usual and place a ladle of this delicious masala in the middle of the dosa and fold the dosa and serve the potato cauliflower masala dosa hot with coconut chutney or tomato onion chutney.

Tips:
*You can also add peas to this masala.
*I used multi grain flour to make the dosas and hence the color of the dosa is a bit different.
*You can add a blob of butter on top of the dosa before serving.

Tuesday, September 9, 2014

Boost Burfi

My son is very fuzzy with drinking milk and I keep trying a new health drink to make him drink milk.He didnt like boost ,and so I stopped giving him boost.The end result- a lot of boost left in the jar on my kitchen shelf,which kept me hunting for a delicious recipe that will help me to make use of the remaining boost.Finally I found a good recipe here and immediately I tried it and it came out well.Kids will love it when the boost is made into these delicious boost burfis and it is a must try.

Boost Burfi

Preparation time:25 mins
Makes nearly 12 pieces

Ingredients:
Maida/All purpose flour-1/2 cup
Boost/any chocolate drink-1/4 cup
Ghee - a little less than 1/4 cup
Sugar-3/4 cup
Water -1/4 cup
Hot water-2 teaspoons

Procedure:

1.Roast the flour in a pan for 5 minutes and make sure it doesn't change color.


2.Add hot water to the boost and mix it to a fine paste with no lumps and keep it outside.


3.To the roasted flour add the ghee and roast it for another two and then remove it from flame and keep it in a bowl.


4.In the same pan add sugar and water and boil it to a one string consistency.That is when you take the  sugar syrup between your thumb and pointer finger and stretch it you should get one string.


5.Keep stirring in the mixture and on e it starts leaving the sides of the pan add the boost paste and stir it for another minute in low flame and then pour this mixture on a greased tray. 


6.Once it cools down cut in to small burfis.your yummy boost burfi is ready.If you are not able to cut into pieces and the mixture is still gooey then don't worry ,again transfer the contents in to the pan and keep stirring in low flame till it comes together .Then pour it into the tray and you will be able to cut into square pieces.

Boost Burfi


Tips:
*The ghee quantity could be increased to 1/2 cup for a melt in burfi,as I found the burfis could have been a bit more melting type.You can add the additional 1/4 th cup of the ghee at regular intervals when stirring the flour and sugar syrup mixture.
*You can mix boost with hot milk also to make a fine paste instead of hot water.
*Throughout the process make sure the flame is low.

Wednesday, September 3, 2014

Pudina thogaiyal/chutney (Mint chutney-I)

Mint Chutney with Upma Kuzhakattai
A mint chutney is always a yes at my home.Be it for idli or dosa or Pidi kuzhakattai or rice ,it goes really well and gives a refreshing taste.When the mixture is grinded coarsely it is called thogaiyal and when it is ground to a fine paste it is called chutney.Generally thogaiyal is had with plain rice and chutney is used with tiffen items.Whenever I recover from any illness and my tongue tastes bitter due to antibiotics ,my mom used to make this mint thogaiyal or chutney for me as it tastes good for that bitter tongue and you will be able to relish it.

Preparation time:20 mins 
Serves :2

Ingredients:
Mint leaves-1 small bunch
Tamarind - 1 small gooseberry size(I soak it before grinding so that it is made in to a fine paste in the mixer)
Urad dhal-1 1/2 tsp
Toor dhal-1 1/2 tsp
Red chillies -3(adjust according to your spice level)
Curry leaves-few
Hing- 1 tsp
Grated coconut-4 tbsp
Salt- to taste
Oil- 2 tsp

Procedure:

1.In a pan,heat a tsp of oil and roast urad dhal,toor dhal,red chillies and curry leaves till the dhals turn golden brown.keep it separately on a plate for it to cool down.


2.In the same pan add another tsp of oil and sauté the mint leaves(wash the mint leaves well and strain before sautéing).after it is sautéed add the grated coconut and hing and mix well and switch off the flame.


3.After all the roasted ingredients cool down add salt and soaked tamarind and grind them in a mixer to a fine paste for mint chutney .
4.For thogaiyal ,first grind the mint leaves,coconut ,red chillies,salt,tamarind to a fine paste.Add the roasted dhals finally and grind the mixer in pulse mode so that the dhals are grounded coarsely.

Mint Thogaiyal

Thinai Pidi Kuzhakattai with Pudina Chutney(Quinoa Dumplings with MintChutney)


Pidi kuzhakattai or Upma kuzhakattai is generally made with broken rice and lentils.This is another very healthy and very tasty version of Pidi kuzhakattai bit made with quinoa or Thinai.believe me ,this was even more delicious and succulent than the regular upma kuzhakattai made with rice.this could be an ideal breakfast or dinner option as Thinai or quinoa is very healthy and works well for all calorie conscious people with no compromise on taste.It goes well with Mint chutney or coriander chutney.Traditionally my mom prepares raw tamarind chutney with upma kuzhakattai and it tastes awesome with the dumplings,but my son and husband likes upma kuzhakattai with mint chutney and even I feel mint chutney tastes great with it.

Preparation time:35 mins
Serves:3

Ingredients:

Quinoa or Thinai -1 cup
Toor dhal or pigeon peas-1 tbsp
Urad dhal or white lentil-1 tbsp
Gram dhal-1 tbsp
Red chillies-4 nos
Green chillies-1 or 2 
Hing-1 tsp
Grated coconut -4 tbsp
Curry leaves -few
Salt-to taste
Sesame oil and coconut oil-1 tbsp each

To temper:
Mustard-1 tsp
Red chillies-1 
Urad dhal-1 tsp
Gram dhal-1 tsp
Curry leaves -few

Procedure:

1.Wash quinoa and other dhals separately and keep.Soak urad dhal,toor dhal and gram dhal along with red chillies and green chillies in water for a minimum of 25 mins.grind it to a coarse paste along with the curry leaves.


2.In a wok heat sesame and coconut oil together and add the tempering ingredients.after the mustard splutter and the dhals turn golden brown ,add 2 1/2 cups of water ,salt,hing,ground dhal and chillies paste and grated coconut.


3.Allow the water to boil.once it starts boiling add the quinoa and cook till all the water is absorbed and the mixture turns like upma.


4.Switch off the flame and after the mixture turns lukewarm make dumplings by taking a little mixture with you palm and pressing it with fingers closed. Do the same with the rest of the mixture also.


5.Steam the dumplings for 10- 12 mins and serve hot with mint chutney.To know the recipe for mint chutney click here.


Tips:
* You can use coconut oil completely instead of using it along with sesame oil.
*Adding hing is essential,as it lends a beautiful flavor to the dish .

Monday, September 1, 2014

Karuveppilai Kuzhambhu(Curry Leaves gravy for rice)-I


Everytime I buy veggies from the nearby grocer ,I get a lot of curry leaves for free and inspite of using them daily for rasam and sambar ,still there was a lot and sometimes they get dried up and ends up in the bin.With all the nutrients in it ,I felt I should not waste it and make it taste delicious to the taste buds as well.So this time I made a lovely and authentic karuveppilai kuzhambhu and had it with plain rice.It was so yummy and one major advantage of this kuzhambhu is that it stays well for 2 days at room temperature and up to 4 days in fridge when used with a dry spoon.I added less oil ,if you wish you can add a little more oil which will definitely increase the taste and shelf life.

Preparation time:30 mins
Serves:3

Ingredients:
Curry leaves -2 cups or 1 big bunch
Tamarind-1 lemon size
Peppercorns-2 tbsp
Red chillies-2 nos
Fenugreek-1/2 tsp
Toor dhal-1 tbsp
Hing-1 tsp
Salt- to taste
Turmeric powder-1 tsp
Oil-2 tbsp

To temper :
Mustard-1 tsp
Fenugreek-1/2tsp

Procedure:

1.Wash the curry leaves well and strain them.


2.Dry roast peppercorns,red chillies,toor dal and 1/2 tsp fenugreek and keep it separately .


3.In the same wok,roast curry leaves well followed by tamarind.


4.Grind all the above roasted ingredients to a fine paste(curry leaves,tamarind,peppercorns,fenugreek,toor dhal and redchillies).


5.Heat 2 tbsp of sesame oil and add the tempering ingredients and turmeric powder.After the mustard splutter add the  ground paste ,1 cup of water ,salt and hing .allow the mixture to boil and after it starts boiling simmer the flame and close the wok with a lid .let it boil till the oil oozes out and the kuzhambhu thickens.


6.If you don't want it too thick ,then switch off the flame after your required consistency is reached when you slow cook it with a lid.serve with hot plain rice and appalam.